Python Devlopment


Introduction


Tkinter is a python interface and used to create a GUI in python programming. Like other programming languages, python also support GUI programming. There are many interfaces for GUI in python like

  • Tkinter
  • wxPython
  • JPython
  • gtk

following are the steps to create GUI

  • Importing the module – tkinter
  • Create the main window (container)
  • Add any number of widgets to the main window
  • Apply the event Trigger on the widgets.

Importing tkinter is same as importing any other module in the python code. Note that the name of the module in Python 2.x is ‘Tkinter’ and in Python 3.x is ‘tkinter’.

import tkinter

OR

from tkinter import *
 

There are two main methods used you the user need to remember while creating the Python application with GUI.

  • Tk(screenName=None,  baseName=None,  className=’Tk’,  useTk=1): To create a main window, tkinter offers a method ‘Tk(screenName=None,  baseName=None,  className=’Tk’,  useTk=1)’. To change the name of the window, you can change the className to the desired one. The basic code used to create the main window of the application is:
    win=tkinter.Tk() where win is the name of the main window object
  • mainloop(): There is a method known by the name mainloop() is used when you are ready for the application to run. mainloop() is an infinite loop used to run the application, wait for an event to occur and process the event till the window is not closed.


win.mainloop()
from Tkinter import *
win=Tk()
#widgets are added here
win.mainloop()


Python Tkinter Geometry

tkinter also offers access to the geometric configuration of the widgets which can organize the widgets in the parent windows. There are mainly three geometry manager classes class.

    1. pack() method:It organizes the widgets in blocks before placing in the parent widget.
    2. grid() method:It organizes the widgets in grid (table-like structure) before placing in the parent widget.
    3. place() method:It organizes the widgets by placing them on specific positions directed by the programmer.

1.  pack() Method

The pack() widget is used to organize widget in the block. The positions widgets added to the python application using the pack() method can be controlled by using the various options specified in the method call.

However, the controls are less and widgets are generally added in the less organized manner.

The syntax to use the pack() is given below.

widget.pack(options)  

A list of possible options that can be passed in pack() is given below.
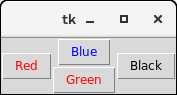
  • expand: If the expand is set to true, the widget expands to fill any space.
  • Fill: By default, the fill is set to NONE. However, we can set it to X or Y to determine whether the widget contains any extra space.
  • size: it represents the side of the parent to which the widget is to be placed on the window.

Example:

# !/usr/bin/python3  
from tkinter import *  
parent = Tk()  
redbutton = Button(parent, text = "Red", fg = "red")  
redbutton.pack( side = LEFT)  
greenbutton = Button(parent, text = "Black", fg = "black")  
greenbutton.pack( side = RIGHT )  
bluebutton = Button(parent, text = "Blue", fg = "blue")  
bluebutton.pack( side = TOP )  
blackbutton = Button(parent, text = "Green", fg = "red")  
blackbutton.pack( side = BOTTOM)  
parent.mainloop()  


Output:

Python Tkinter


2. grid() Method

The grid() geometry manager organizes the widgets in the tabular form. We can specify the rows and columns as the options in the method call. We can also specify the column span (width) or rowspan(height) of a widget.

This is a more organized way to place the widgets to the python application. The syntax to use the grid() is given below.

Syntax is

widget.grid(options)

A list of possible options that can be passed inside the grid() method is given below.
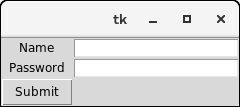
  • Column
    The column number in which the widget is to be placed. The leftmost column is represented by 0.
  • Columnspan
    The width of the widget. It represents the number of columns up to which, the column is expanded.
  • ipadx, ipady
    It represents the number of pixels to pad the widget inside the widget's border.
  • padx, pady
    It represents the number of pixels to pad the widget outside the widget's border.
  • row
    The row number in which the widget is to be placed. The topmost row is represented by 0.
  • rowspan
    The height of the widget, i.e. the number of the row up to which the widget is expanded.
  • Sticky
    If the cell is larger than a widget, then sticky is used to specify the position of the widget inside the cell. It may be the concatenation of the sticky letters representing the position of the widget. It may be N, E, W, S, NE, NW, NS, EW, ES.


Example:

# !/usr/bin/python3  
from tkinter import *  
parent = Tk()  
name = Label(parent,text = "Name").grid(row = 0, column = 0)  
e1 = Entry(parent).grid(row = 0, column = 1)  
password = Label(parent,text = "Password").grid(row = 1, column = 0)  
e2 = Entry(parent).grid(row = 1, column = 1)  
submit = Button(parent, text = "Submit").grid(row = 4, column = 0)  
parent.mainloop()  


Output:

Python Tkinter


3. place() Method

The place() geometry manager organizes the widgets to the specific x and y coordinates.

A list of possible options is given below.

  • Anchor: It represents the exact position of the widget within the container. The default value (direction) is NW (the upper left corner)
  • bordermode: The default value of the border type is INSIDE that refers to ignore the parent's inside the border. The other option is OUTSIDE.
  • height, width: It refers to the height and width in pixels.
  • relheight, relwidth: It is represented as the float between 0.0 and 1.0 indicating the fraction of the parent's height and width.
  • relx, rely: It is represented as the float between 0.0 and 1.0 that is the offset in the horizontal and vertical direction.
  • x, y: It refers to the horizontal and vertical offset in the pixels.

Example

# !/usr/bin/python3  
from tkinter import *  
top = Tk()  
top.geometry("400x250")  
name = Label(top, text = "Name").place(x = 30,y = 50)  
email = Label(top, text = "Email").place(x = 30, y = 90)  
password = Label(top, text = "Password").place(x = 30, y = 130)  
e1 = Entry(top).place(x = 80, y = 50)  
e2 = Entry(top).place(x = 80, y = 90)  
e3 = Entry(top).place(x = 95, y = 130)  
top.mainloop()  


Output:

Python Tkinter